1. 关闭错误报告
可以选择直接卸载
apport这个软件包, 但最好还是改配置
| |
贴个图

2.关于根分区文件系统的选择
ext4老当益壮,选他没错
btrfs真香, subvolume很赞!
拿了个64GB的U盘(因为我想搞个Ubuntu2GO的东东)跑了下分:
跑分代码如下,哪抄的忘了,就是随机建大量小文件,然后再写&读,看耗时多少
| |
U盘被我格成这样:
| |
各分区挂载参数均是Ubuntu系统默认参数
| |
测试机系统:

内核版本:
Linux xiaoxinpro 5.3.0-24-generic #26-Ubuntu SMP Thu Nov 14 01:33:18 UTC 2019 x86_64 x86_64 x86_64 GNU/Linux
跑分结果:
| create files | rewrite files | read linear | read random | delete all files | |
|---|---|---|---|---|---|
| ext4 | 0.593394041 | 3.646025896 | 0.960836887 | 2.286855936 | 0.646140814 |
| btrfs | 5.707916975 | 2.0158391 | 0.446825027 | 2.039553881 | 2.933115005 |
| f2fs | 0.737277031 | 2.216201067 | 0.841583014 | 2.216186047 | 17.70262408 |
| xfs | 0.781413078 | 5.908052206 | 1.212768078 | 3.198234081 | 4.744434118 |
| reiserfs | 1.735713959 | 1.866363049 | 0.23438096 | 1.559979916 | 2.575639963 |
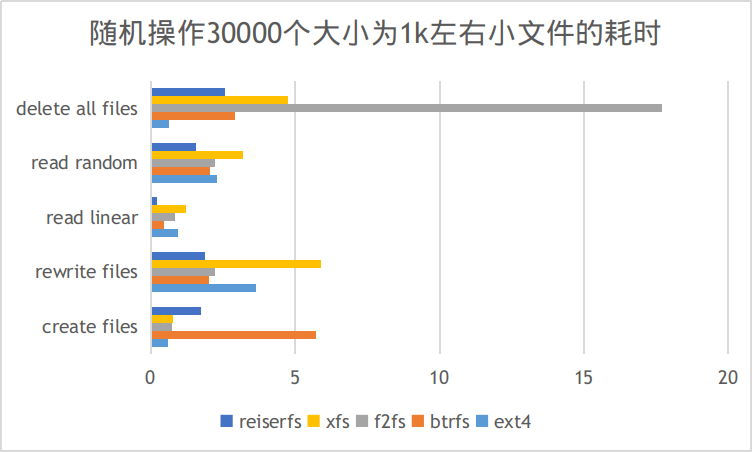
对于系统性能影响最大的应该是随机读写,这么看来还是reiserfs牛逼,几乎全面领先,可惜这货作者杀老婆,进局子了,但并不妨碍我用脚投票,选,然并卵,Ubuntu用这货做根分区丢资料,放弃。剩下的,reiserfs做根分区文件系统ext4还是老当益壮,btrfs也可以,xfs则并没有如网传那样犀利,f2fs删除文件居然那么慢。
3. TLP - Linux电源优化利器
via: https://linrunner.de/en/tlp/docs/tlp-linux-advanced-power-management.html
有人说跟
powertop搭配可能效果更好,然而我不觉得,这两货一起用卡的要死,所以只留一个就好
btrfs 文件系统的话, 需要改个东西
| |
4. 要不要swap分区
我倾向于不要,万一想要swap了完全可以用swapfile的形式随用随开
Archlinux Wiki的文档真是优秀
摘抄几个命令
Swap file creation
For copy-on-write file systems like Btrfs, first create a zero length file, set the No_COW attribute on it with chattr, and make sure compression is disabled:
# truncate -s 0 /swapfile
# chattr +C /swapfile
# btrfs property set /swapfile compression none
See Btrfs#Swap file for more information.
Use fallocate to create a swap file the size of your choosing (M = Mebibytes, G = Gibibytes). For example, creating a 512 MiB swap file:
# fallocate -l 512M /swapfile
Note: fallocate may cause problems with some file systems such as F2FS.[1] As an alternative, using dd is more reliable, but slower:
# dd if=/dev/zero of=/swapfile bs=1M count=512 status=progress
Set the right permissions (a world-readable swap file is a huge local vulnerability):
# chmod 600 /swapfile
After creating the correctly sized file, format it to swap:
# mkswap /swapfile
Activate the swap file:
# swapon /swapfile
Finally, edit the fstab configuration to add an entry for the swap file:
/etc/fstab
/swapfile none swap defaults 0 0
For additional information, see fstab#Usage.
Note: The swap file must be specified by its location on the file system not by its UUID or LABEL.
Remove swap file
To remove a swap file, it must be turned off first and then can be removed:
# swapoff /swapfile
# rm -f /swapfile
关于性能也抄几句,我给
vm.swappiness配了1
Performance
Swap operations are usually significantly slower than directly accessing data in RAM. Disabling swap entirely to improve performance can sometimes lead to a degradation, since it decreases the memory available for VFS caches, causing more frequent and costly disk I/O.
Swap values can be adjusted to help performance:
Swappiness
The swappiness sysctl parameter represents the kernel's preference (or avoidance) of swap space. Swappiness can have a value between 0 and 100, the default value is 60. A low value causes the kernel to avoid swapping, a higher value causes the kernel to try to use swap space. Using a low value on sufficient memory is known to improve responsiveness on many systems.
To check the current swappiness value:
$ sysctl vm.swappiness
Alternatively, the files /sys/fs/cgroup/memory/memory.swappiness or /proc/sys/vm/swappiness can be read in order to obtain the raw integer value.
Note: As /proc is a lot less organized and is kept only for compatibility purposes, you are encouraged to use /sys instead.
To temporarily set the swappiness value:
# sysctl -w vm.swappiness=10
To set the swappiness value permanently, create a sysctl.d(5) configuration file. For example:
/etc/sysctl.d/99-swappiness.conf
vm.swappiness=10
To test and more on why this may work, take a look at this article.
5. 常用软件
Google Chrome/ChromiumEdge已经堪用, 巨硬威武!!!
支持的一些启动参数如下所示,我一般用的是--disk-cache-dir=/tmp/chrome_cache --process-per-site,即缓存扔到/tmp分区,每个站点使用一个进程
对于Chromium,可以在/etc/chromium-browser/default添加自己想要的配置参数,而对于Google Chrome,貌似只能从这里/usr/share/applications/chromium-browser.desktop加
| |
- Foxit Reader
安装方法见:https://websiteforstudents.com/how-to-install-foxit-reader-on-ubuntu-16-04-17-10-18-04-desktop/
- Barrier 在Linux和其他设备之间共享键盘和鼠标
我是从snap安装的,挺方便,务必带好梯子
- FlameShot - 火焰截图
最近发现高分屏上面用他会冻屏,参考这里的解决方法暂时得到解决 https://github.com/flameshot-org/flameshot/issues/564#issuecomment-750014960
DeepinTerminal - 深度终端
alacritty - 最近在用这个,跟tmux搭配还是蛮舒服
CopyQ - 剪贴板增强
Qv2ray - 梯子客户端
Typora - MarkDown编辑器,配合坚果云同步算是比较非常舒服的个人文档管理方案了
6. SNAP相关不再推荐装这玩意
一起来干掉这些傻逼的 Snap,恢复原有的商店。
| |
删掉所有的已经安装的 Snap 软件。
| |
干掉 Snap 的 Core 文件,很大哟。
sudo apt autoremove --purge snapd
干掉 Snap 的管理工具。
| |
干掉 Snap 的目录。
| |
干掉 Snap 的更新源。
有人号称装完Ubuntu第一时间卸载snap, 但我觉得很香
挂梯子
新的snap看起来用上了国内CDN,不用挂梯子也可以很舒服了
- 删除旧的snap包
| |
7. 禁用普通用户锁定/登出/关机/重启
https://askubuntu.com/a/1064704
Disable Lock Screen
You can disable the lock screen permanently when waking from suspend.
First use this command to discover current settings:
$ gsettings get org.gnome.desktop.lockdown disable-lock-screen
false
Now set it to true using this command:
gsettings set org.gnome.desktop.lockdown disable-lock-screen 'true'
If you are unhappy with the new setting you can reverse it using:
gsettings set org.gnome.desktop.lockdown disable-lock-screen 'false'
Disable Screen Saver Locking
There was some confusion where people think disabling the Lock screen also disables the screen saver which is invoked after a certain period of inactivity. The screen saver requires input to get your desktop back. Some people may want the screen saver to come on but not have it locked when waking up the screen.
To check screen saver lock status use:
$ gsettings get org.gnome.desktop.screensaver lock-enabled
true
If true you can turn off screen saver locking with:
gsettings set org.gnome.desktop.screensaver lock-enabled false
To reverse the setting back use:
gsettings set org.gnome.desktop.screensaver lock-enabled true
In Gnome screen locking guide it says:
6.2. Screen Locking
By default, GNOME Power Manager supports a simple locking scheme. This means that the screen will lock if set to Lock screen in gnome-screensaver when the lid is closed, or the system performs a suspend or hibernate action.
There is a complex locking scheme available for power users that allows locking policy to change for the lid, suspend and hibernate actions. To enable this complex mode, you will have to disable the GConf key:
/apps/gnome-power-manager/lock/use_screensaver_settingsThen the policy keys can be set to force a gnome-screensaver lock and unlock when the action is performed:
/apps/gnome-power-manager/lock/blank_screen/apps/gnome-power-manager/lock/suspend/apps/gnome-power-manager/lock/hibernate
8. 文件管理nautilus左侧边栏消失
If you want to come back to default behavior (nautilus with sidebar) you can simply set the previous setting to true:
gsettings set org.gnome.nautilus.window-state start-with-sidebar true
9. This location could not be displayed
chmod -R 775 /media
# NOTE: I am not responsible for any expired content.
create@2020-01-02T11:29:24+08:00
update@2022-11-06T06:45:17+08:00
comment@https://github.com/ferstar/blog/issues/11